
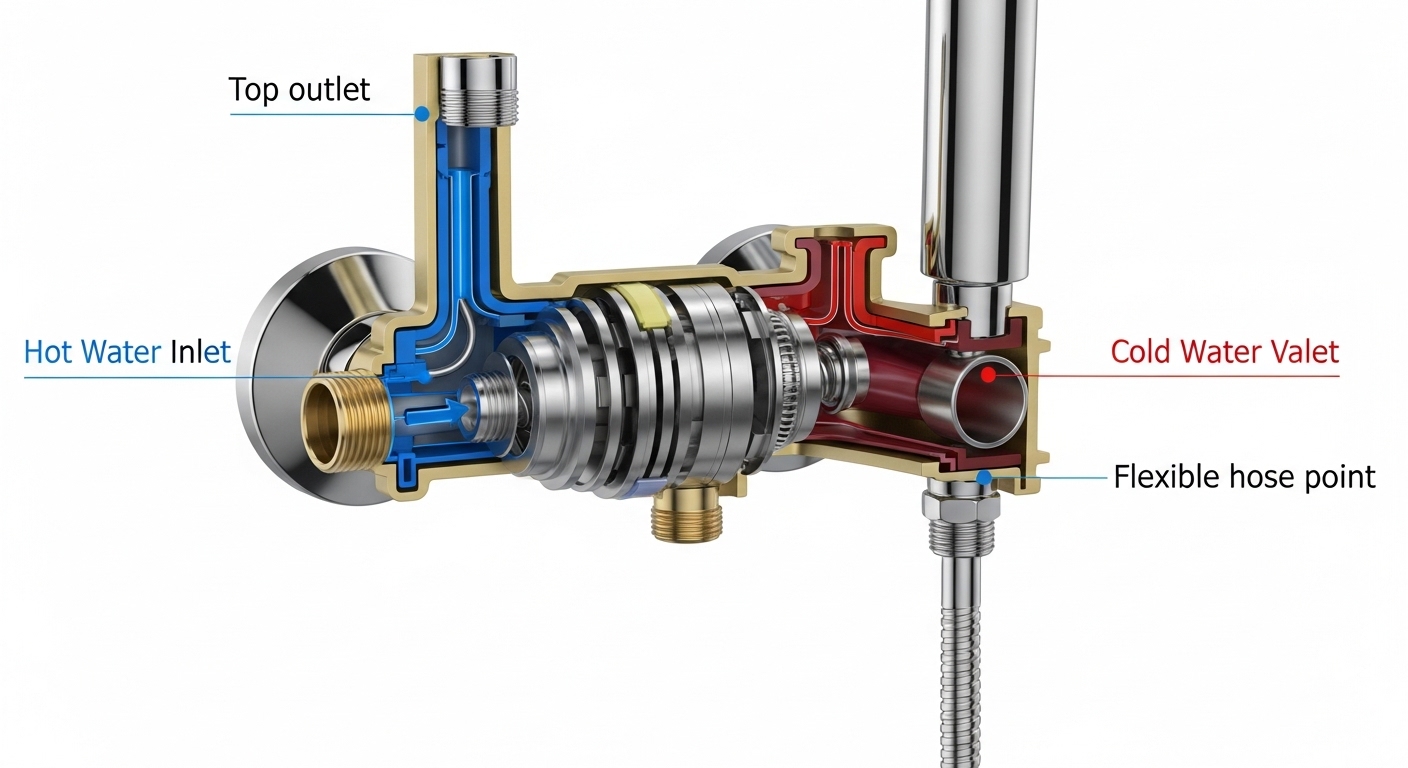
Learning how to install a shower mixer with diverter is one of the more approachable bathroom upgrades you can tackle yourself, as long as you understand what the diverter actually does and where it sits in the plumbing. A shower mixer blends hot and cold water into one comfortable temperature; the diverter is the extra control that sends that blended water to a different outlet — usually switching between an overhead rain head and a handheld sprayer, or between a tub spout and the shower. Get those two functions straight in your head and the rest of the job is mostly careful connections and good sealing.
Below, we walk through the whole thing the way a knowledgeable friend would explain it at your kitchen table: what parts you need, the exact steps, the mistakes that cause leaks, and honest answers to the questions people actually ask before they pick up a wrench.
What exactly is a shower mixer with a diverter, and do I need one?
A shower mixer with a diverter is a single valve body that both blends hot and cold water to your chosen temperature and lets you redirect that water between two or more outlets. You need one whenever your shower has more than one spray option — say a fixed rain head plus a handheld wand, or a bathtub spout plus a shower — because without a diverter, water would flow from every outlet at once.
There are two common layouts. A 2-way diverter switches between two outlets (fixed head ↔ handheld). A 3-way diverter feeds three outlets, letting you run, for example, an overhead, a handheld, and body jets independently. The diverter mechanism itself lives in one of three places:
- Integrated in the mixer body — one wall plate, one temperature handle, and a separate diverter lever or button. Cleanest look, most common in modern builds.
- In the tub spout — a little pull-up knob on the spout that sends water upward to the shower head. Common in older American tub/shower combos.
- A standalone diverter valve — a second trim mounted beside the mixer, wired to its own cartridge.
If you’re replacing a single-function shower with a dual-outlet setup, an integrated mixer-with-diverter is almost always the right call. It keeps the wall clean and gives you one place to control everything.
What tools and parts do I need before I start?
You need a small, predictable kit — nothing exotic. Gather everything before you shut the water off, because a half-finished job with the mains closed is a miserable place to be.
- Adjustable wrench and a set of hex/Allen keys (most trim screws are hex)
- PTFE thread-seal tape (plumber’s tape) and neutral-cure silicone sealant
- A basin/strap wrench for tight recesses
- A cordless drill, level, and tape measure
- The shower mixer + diverter kit itself, including the rough-in valve body, cartridge, trim plate, handle, and O-rings
- Shower arm, fixed head, and (if applicable) handheld hose + holder
- Clean rags and a bucket for residual water
One tip that saves people a second trip: confirm your inlet thread size (commonly 1/2 inch NPT in the US, or 1/2 inch BSP in the UK/EU) and whether your supply pipes are copper, PEX, or braided flexi. The mixer’s inlets and your existing pipes must match, or you’ll need an adapter. If you’re at all unsure which small fittings connect what, our guide on the essential chrome faucet parts you need to know before you repair or replace one is a useful primer on threads, O-rings, and cartridges that applies directly to shower valves too.
How do I actually install the shower mixer with diverter, step by step?
Here’s the core answer: shut off the water, fit and secure the valve body in the wall, connect hot to hot and cold to cold with taped threads, pressure-test before you close the wall, then fit the trim and diverter last. Below is the full sequence.
Step 1 — Turn off the water and drain the lines
Close the main supply (or the bathroom’s local shutoff). Open the lowest faucet in the house to drain residual pressure, then open the shower outlet so trapped water escapes. Skipping this step is the number-one cause of a soaked bathroom.
Step 2 — Position the valve body at the right height
Mount the mixer valve so its centerline sits 42 to 48 inches (roughly 110–120 cm) above the finished floor — 45 inches is a comfortable default. The shower arm outlet typically roughs in around 76–80 inches. Use a level; a crooked valve means a crooked handle forever. Most rough-in bodies have a printed depth guide showing how far it should sit behind the finished wall surface — respect that line so your trim plate later sits flush.
Step 3 — Connect the supply lines (hot left, cold right)
Standard convention is hot on the left inlet, cold on the right, with the shower outlet at the top and the diverter/second outlet at the bottom or side (check your model’s stamped markings). Wrap each male thread with 3–4 turns of PTFE tape in the direction the fitting tightens. Hand-tighten, then snug about a quarter to half turn more with a wrench — firm, not gorilla-tight. Overtightening cracks brass.
Step 4 — Connect the diverter outlet
Route the second outlet to its destination: a drop-elbow for a handheld hose, or up to the shower arm. If your kit uses a cartridge-style diverter, make sure the cartridge is seated fully and the retaining clip or nut is engaged before you close anything up. A loose diverter cartridge causes that annoying “water dribbles from both outlets” symptom.
Step 5 — Pressure-test before closing the wall
This is the step people regret skipping. Turn the water back on slowly and watch every joint for 10–15 minutes. Any weep, however small, means backing off, adding tape, and re-seating. It is far easier to fix a leak now than after the tile goes up.
Step 6 — Seal, fit the trim, and attach the diverter handle
Once dry, close the wall. Run a bead of neutral-cure silicone around the back edge of the escutcheon (trim plate) — leave the bottom unsealed so any hidden moisture can escape and be seen. Fit the temperature handle, then the diverter lever or button. Attach the shower arm and head, taping that thread too. Turn the water on, cycle the diverter a few times, and confirm water switches cleanly between outlets with no cross-flow.
Hot left or cold right — and which way does the diverter go?
Yes, the standard is hot on the left and cold on the right, and the diverter almost always defaults to the lower or primary outlet (tub spout or fixed head) when it’s at rest, redirecting to the secondary outlet only when you actively pull, push, or turn it. This matters because a reversed hot/cold connection means your handle runs backwards forever, and a mis-installed diverter cartridge can send water to the wrong place or leak between outlets.
If you get hot and cold swapped, you don’t have to re-plumb — many pressure-balance and thermostatic cartridges can be rotated or reindexed, or you can simply swap the supply lines. But it’s far cleaner to get it right the first time. When in doubt, run the hot tap at the sink and feel which supply pipe warms up before you commit.
How is this different from installing a handheld or no-drill shower head?
A mixer-with-diverter install is a plumbing job inside the wall; a handheld or no-drill shower head is a surface swap that touches no valves. If all you want is a handheld sprayer without opening the wall, you don’t necessarily need a new mixer at all — you can add a diverter at the shower arm or use a slide bar. Our walkthrough on how to install a handheld shower head with no drill covers that easier path, and if you want the wand to park itself neatly, the comparison of a handheld shower head magnetic dock versus a standard holder is worth a read before you buy.
The table below shows where each approach fits.
| Setup | Wall opened? | Difficulty | Time | Best for |
|---|---|---|---|---|
| Integrated shower mixer with diverter | Yes (rough-in valve) | Intermediate | 2–4 hrs | New build or full remodel with dual outlets |
| Tub-spout diverter replacement | No | Easy | 20–40 min | Existing tub/shower combo, weak diverter pull-up |
| Shower-arm diverter (for handheld) | No | Easy | 15–30 min | Adding a handheld to a single fixed head |
| No-drill handheld with slide/holder | No | Very easy | 10–20 min | Renters, quick upgrades, no tools |
Why does my diverter leak or lose pressure — and how do I fix it?
The most common reason a diverter leaks or lets water dribble from both outlets at once is a worn O-ring or a diverter cartridge that isn’t fully seated — not the whole valve. Before you assume the worst, isolate whether the problem is the diverter or the supply connections.
- Water from both outlets at once: the diverter isn’t sealing. Shut off water, pull the diverter cartridge, and inspect the O-rings and washer. Replace worn rubber; often that’s a $5 fix.
- Weak pressure after switching to the handheld: check the hose for kinks and clean the handheld’s inlet screen — mineral scale clogs it fast in hard-water areas.
- Drip from behind the trim plate: usually a supply-thread leak, not the diverter. This is the same class of problem as any threaded valve leak — the same logic in our guide on how to fix a leaking tap valve yourself in under an hour applies to shower valves.
A quick note on hard water, since it shortens the life of every moving part in a shower: if your area has heavy mineral content, matching your diverter to a good-quality fixed head matters. Our piece on what rainfall shower head name you should actually search for helps you pick a head with cleanable silicone nozzles that won’t scale up and choke your new diverter’s flow.
Do I need a plumber, or is this genuinely DIY-safe?
If your supply lines are already roughed in and you’re swapping trim or cartridges, this is genuinely DIY-safe for a careful beginner. If you’re cutting into copper, moving the valve location, or soldering new lines, that’s when a licensed plumber earns their fee — mistakes behind a tiled wall are expensive to reach.
Be honest with yourself about three things: can you reliably shut off and drain the water, are you comfortable making watertight threaded connections, and can you access the back of the wall if something goes wrong? If the answer to all three is yes, go for it. If your build requires soldered joints or code-inspected work, get the rough-in done professionally and do the trim yourself — that split saves money and keeps you inside the rules.
FAQ
How high should a shower mixer with diverter be installed?
Mount the mixer valve centerline about 42–48 inches (110–120 cm) above the finished floor, with 45 inches a comfortable middle ground. The shower arm outlet typically roughs in around 76–80 inches. Adjust for the tallest regular user, but keep the diverter reachable without stretching.
Can I add a diverter to an existing shower mixer without replacing it?
Often yes. If you only want to add a handheld sprayer, a shower-arm diverter or an in-line diverter valve lets you branch a second outlet without touching the wall valve. You only need a full mixer-with-diverter replacement if the existing valve body has no second outlet or the internal diverter is failing.
Which side is hot and which is cold on a shower mixer?
By standard convention, hot connects to the left inlet and cold to the right, with the shower outlet up top and the diverter outlet at the bottom or side. Always check the markings stamped on your specific valve body, and test which supply pipe warms up before committing.
Why does water come out of both the shower head and handheld at once?
That’s a diverter that isn’t sealing, almost always due to a worn O-ring or a cartridge that isn’t fully seated. Shut off the water, pull the diverter cartridge, replace the rubber seals, and reseat it firmly. It’s usually a cheap, quick fix rather than a whole-valve replacement.
Do I need to solder pipes to install a shower mixer with diverter?
Not necessarily. If your supply lines end in threaded connections or you use braided flexi hoses and push-fit or compression adapters, no soldering is required. Soldering only comes in when you’re joining or extending bare copper pipe — that’s the point where many DIYers bring in a plumber for the rough-in.
How long does it take to install a shower mixer with diverter?
For a trim-and-cartridge job on an existing rough-in, plan on 2–4 hours including the pressure test and silicone cure check. A full rough-in with new pipework takes longer and may span a couple of sessions, especially if tiling has to be re-done around the valve.
A note on doing this right
Author note: This guide was written by the avovida fixtures team, who install, test, and troubleshoot shower valves and diverters week in and week out across both US (NPT) and UK/EU (BSP) plumbing standards. We’ve written it to be the plain-English answer we wish more product manuals gave.
Brand credibility: avovida (avovida.net) specializes in faucets, shower systems, and bathroom fixtures, and we pressure-test the mixers and diverters we recommend against real-world flow and durability conditions before we put our name on them. When you’re choosing a mixer, look for valve bodies that carry recognized certifications (such as cUPC/WRAS listing depending on your region) and a manufacturer warranty on the cartridge — a solid brand backs its diverter cartridge for years, and that warranty is your best signal of quality. If a mixer’s cartridge isn’t covered or its standards aren’t stated, treat that as a reason to shop elsewhere.