
Getting the tub spout height off tub right is one of those small plumbing decisions that quietly makes or breaks a bathroom. Set it too low and you can’t slide a cleaning bucket underneath or the spout ends up underwater when the tub is full; set it too high and it looks awkward, splashes, and wastes wall space. The good news: there’s a well-understood sweet spot, and once you know the numbers and the “why” behind them, you can rough-in your valve and drop-ear elbow with confidence — whether you’re doing a full remodel or just swapping a spout.
Below, we’ll answer the real questions people actually ask before they cut a hole in the wall or tighten a spout: how high it should be, why the air gap matters, what changes for a freestanding tub, and how to avoid the mistakes that force people to re-do the work. Everything here is measured, code-aware, and written for someone standing in a half-finished bathroom with a tape measure in hand.
How High Should a Tub Spout Be Above the Tub, Exactly?
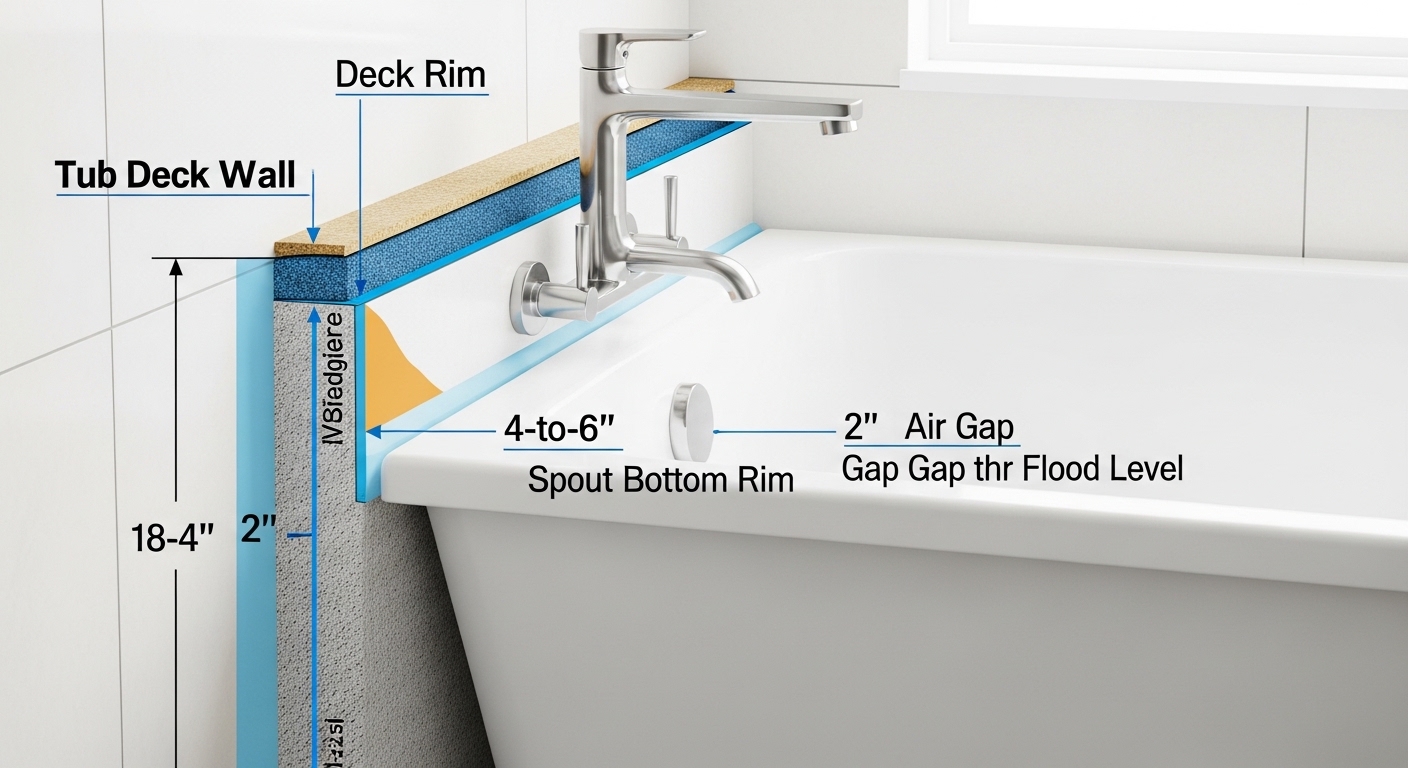
For a standard wall-mounted spout, aim for the bottom edge of the spout to sit 4 to 6 inches above the tub deck (the finished rim you’d rest a shampoo bottle on). Most plumbers default to right around 4 inches, which looks clean and leaves enough clearance to fill a bucket or rinse a mop head underneath.
Here’s the reasoning behind that range. Too close to the rim (under 3 inches) and you lose usable clearance — you can’t get a pitcher or bucket under the stream, and the spout can look like it’s growing out of the tub. Push it much past 6 inches and two problems show up: water falling from higher up splashes harder when it hits the tub floor, and the spout starts to visually float too far from the tub, breaking the proportion with the tub filler and any wall-mounted valve trim above it.
There’s a second, non-negotiable number that overrides aesthetics: the air gap. The opening of the spout must stay at least 2 inches above the flood-level rim of the tub — the highest point water could reach before it overflows (usually the overflow drain, or the tub edge if there’s no overflow). This is a plumbing-code and cross-connection requirement, not a style preference, and we’ll dig into it in the next section.
- Typical target: 4 inches from tub rim to bottom of spout.
- Acceptable range: 4–6 inches for most standard tubs.
- Hard minimum air gap: 2 inches from spout opening to the flood-level (overflow) line.
- Spout projection (how far it sticks out): position the outlet so water lands well inside the tub, typically 4–6 inches of reach past the wall.
Why Does the 2-Inch Air Gap Above the Overflow Matter So Much?
The 2-inch air gap prevents dirty tub water from being siphoned back up into your clean water supply if the home’s water pressure suddenly drops. That’s called back-siphonage, and the air gap is the physical barrier that stops it. It’s why codes are strict about spout height relative to the flood level, not just the tub rim.
Picture this: your tub is full to the overflow, and a water main break down the street drops household pressure to near zero. Without an air gap, water can literally get pulled backward through the spout into the pipes. The 2-inch column of open air between the spout opening and the highest water level breaks that path — bath water can’t climb 2 inches of nothing to reach the outlet. This is the same principle that keeps sink faucets and their aerators safely above sink flood rims.
Practically, this means you measure your air gap from the overflow drain plate, not the top edge of the tub, because the overflow is where the water level actually tops out during a normal bath. On most standard tubs the overflow sits several inches below the rim, so a spout at 4 inches above the rim easily clears the 2-inch gap. But on deep soaking tubs or unusual installs, always confirm — don’t assume.
What Changes if You Have a Freestanding Tub or a Deck-Mount Filler?
For a freestanding tub, the “height off tub” rule flips: the spout arcs over the tub rim from a floor-mounted or deck-mounted filler, so your key measurement is the height of the spout outlet above the tub’s flood level, and the reach needed to clear the rim and pour water toward the center of the tub. You’re no longer setting a spout into a wall — you’re choosing a filler tall enough for your specific tub.
Freestanding tub fillers are sold in fixed heights (commonly 38–44 inches tall to the spout), and the tub’s own height eats into that. A tall Japanese-style soaking tub with a 25-inch wall needs a taller filler than a low 15-inch tub, or the spout won’t clear the rim with enough drop to pour comfortably. As a rule, you want the spout outlet a few inches above and slightly inside the tub rim so water falls into the basin, not down the outside. If you’re matching finishes and coordinating a freestanding setup, our guide to the best freestanding tub filler that matches Delta Champagne Bronze walks through height and reach alongside finish matching.
Deck-mounted fillers (mounted on a tub deck or platform) are different again — there the spout height is short and fixed by the filler body, and your job is mainly making sure the outlet still clears the flood-level line by 2 inches and reaches far enough over the water. In all three cases the underlying safety rule — 2 inches above flood level — never changes; only the mounting method and the aesthetic target height do.
What’s the Difference Between Spout Height and the Rough-In Height Behind the Wall?
Spout height is what you see (spout to tub rim); rough-in height is where the drop-ear elbow or valve sits inside the wall, and the two are connected but not the same number. If you get the rough-in wrong, no amount of adjusting later will give you the finished height you wanted. This is the step that trips up DIYers.
For a slip-on or threaded wall spout, the finished height is set by the drop-ear elbow (the fitting the spout nipple screws into). Position that elbow in the wall so that, once the spout is on, its bottom lands at your target 4–6 inches above the rim. For the tub/shower valve itself, the common rough-in is roughly 28 inches above the tub floor for the valve body, but that’s the mixing valve, not the spout — the spout supply tees off below it. Always follow the height in your specific valve’s spec sheet, because trim kits vary.
| Measurement | Typical target | Why it matters |
|---|---|---|
| Spout bottom above tub rim | 4–6 in (4 in typical) | Clearance to fill buckets; visual proportion |
| Air gap above flood/overflow level | 2 in minimum | Code — prevents back-siphonage |
| Tub/shower mixing valve rough-in | ~28 in above tub floor | Comfortable reach; per valve spec sheet |
| Shower head arm outlet | ~78–80 in above floor | Above most users’ heads (separate from spout) |
| Spout reach (projection) | 4–6 in past wall | Water lands inside the tub, not on the rim |
One more detail: measure from the finished surface. If your tile isn’t up yet, account for tile plus thinset thickness (often about ½ inch) so the spout nipple projects the right amount after tiling. A spout that fit perfectly on bare backer board can end up sucked too far into the wall — or sticking out crooked — once tile goes on.
How Do You Set the Right Tub Spout Height Step by Step?
Setting the correct tub spout height off tub comes down to five measured steps: find your flood level, add the air gap, choose a rim-relative height, locate the drop-ear elbow accordingly, and confirm after tiling. Do them in order and you won’t have to open the wall twice.
- Mark the flood level. Identify the highest point water reaches — usually the top of the overflow drain. Draw a light line there.
- Add the 2-inch air gap. Measure 2 inches up from the flood line; the spout opening must never sit below this. This is your safety floor.
- Pick the finished height. For looks and function, target the spout bottom 4–6 inches above the tub rim, as long as that also clears the air-gap line.
- Set the drop-ear elbow. Secure the elbow in the wall so the spout, once threaded on, lands at your chosen height. Dry-fit the actual spout before you close the wall.
- Verify after tile. Once tile is set, thread the spout on with plumber’s tape and confirm the height and that the outlet points water into the tub. Adjust the nipple length if needed.
If your spout also feeds a shower via a diverter, height interacts with plumbing behind the wall. A spout mounted too high relative to the valve, or a worn diverter, can leave water dribbling from the spout while the shower runs. Our explainer on which tub spout with diverter you actually need covers how the diverter and spout height work together, and if you’re routing a shower off the same valve, installing a shower mixer with a diverter pairs naturally with this rough-in.
What Are the Most Common Tub Spout Height Mistakes People Make?
The three biggest mistakes are ignoring the flood-level air gap, measuring from bare wall instead of finished tile, and mounting the spout so high it splashes and looks disproportionate. Each one is avoidable if you measure twice before committing.
- Skipping the air gap check. People measure only from the tub rim and forget the overflow line, especially on deep soaking tubs where the rim is far above the water.
- Forgetting tile thickness. Rough-in on backer board, then the spout ends up buried or crooked after tile. Always add finished-surface thickness.
- Going too high for “modern” looks. A spout 8–10 inches up splashes and looks stranded. Stay in the 4–6 inch band.
- Wrong spout type for the nipple. Slip-on spouts need a copper stub of a specific length; threaded spouts need a threaded nipple. Mixing them up causes leaks and misalignment.
- Not sloping the outlet down. The spout should let water drain fully so it doesn’t dribble or freeze in cold walls.
If you’re replacing an old spout and finding worn or corroded fittings behind it, it’s worth knowing your components before you buy. Our rundown of essential chrome faucet parts helps you identify nipples, elbows, and escutcheons so you order the right replacement the first time.
Author Note, Brand Credibility, and Standards
This guide was written by the avovida fixtures team, drawing on hands-on bathroom rough-in and spout replacement work across both wall-mounted and freestanding tub setups. avovida (avovida.net) specializes in faucets, tub fillers, shower systems, and bathroom fixtures, and we pressure-test and dry-fit the products we recommend rather than repeating spec sheets.
The height and air-gap figures here align with widely adopted plumbing code practice (the 2-inch air gap above the flood-level rim is a standard cross-connection requirement) and with valve manufacturers’ rough-in specifications. Whenever you install a spout or valve, follow the exact rough-in dimensions and warranty guidance on your specific product’s spec sheet — using approved fittings and correct heights is often what keeps the manufacturer’s warranty valid. When numbers conflict, code minimums and the manufacturer’s documented spec always win over a rule of thumb.
FAQ
How high should a tub spout be off the tub rim?
Aim for the bottom of the spout to sit 4 to 6 inches above the tub rim, with about 4 inches being the most common target. That range gives you clearance to fill a bucket underneath and keeps the spout looking proportional, while still easily clearing the required air gap above the flood level.
What is the minimum air gap between a tub spout and the water level?
The spout opening must sit at least 2 inches above the flood-level rim — the highest point water can reach, usually the overflow drain. This 2-inch air gap is a plumbing-code requirement that prevents dirty tub water from being back-siphoned into your clean water supply if house pressure drops.
Does the tub spout height change for a deep soaking or freestanding tub?
Yes. On deep tubs the overflow (flood level) sits much higher relative to the floor, so you must re-check the 2-inch air gap rather than assume. For freestanding tubs, you’re choosing a floor- or deck-mount filler tall enough to arc the spout a few inches above and slightly inside the rim, rather than setting a spout into a wall.
What height do you rough-in a tub and shower valve?
The mixing valve body is commonly roughed in around 28 inches above the tub floor, but this is separate from the spout, which tees off below it. Always follow your specific valve’s spec sheet, since the shower head arm (typically 78–80 inches up) and spout each have their own dimensions.
Why does my tub spout leak or dribble even at the right height?
If the spout is at the correct height but still drips while the shower runs, the issue is usually a worn diverter inside the spout rather than the mounting height. Replacing the spout with a matched diverter spout, or checking the valve, typically fixes it — height mainly affects splash and clearance, not internal sealing.
Can I lower or raise an existing tub spout without opening the wall?
Only slightly, and only by changing the nipple length or spout style — the real height is fixed by the drop-ear elbow behind the tile. To meaningfully move the spout up or down, you generally have to open the wall and reposition the elbow, which is why getting the rough-in right the first time matters so much.