
If you need to replace kitchen faucet that has copper supply lines, you’re dealing with the most common — and most misunderstood — plumbing scenario in older American kitchens. Rigid copper risers feel intimidating compared to today’s color-coded braided hoses, but the connection points are predictable once you know what you’re looking at. This guide from the Avovida fixtures team walks you through every decision, from confirming the line type and choosing the right adapter to torquing the final compression nut without crushing the copper.
Why You May Need to Replace a Kitchen Faucet That Has Copper Supply Lines
Copper supply lines were the residential standard in American homes from roughly 1960 through the late 1990s, and millions of houses still rely on them. They’re durable, code-approved, and rarely the reason a faucet fails. What does fail is the faucet itself: cartridges wear out, sprayer hoses leak under the deck, finishes corrode at the base, and aerators clog beyond rescue. When you finally pull the trigger on a new pull-down or bridge faucet, you inherit the existing copper as part of the job.
The good news: nearly every modern kitchen faucet — including 1/2-inch IPS and 3/8-inch compression models — can be adapted to existing 3/8-inch copper risers without re-piping the wall. The trick is identifying exactly how your copper line terminates today, then matching that termination to the inlet on your new faucet. Get that diagnosis right, and the rest is wrench work.
Identify How Your Copper Supply Lines Currently Connect
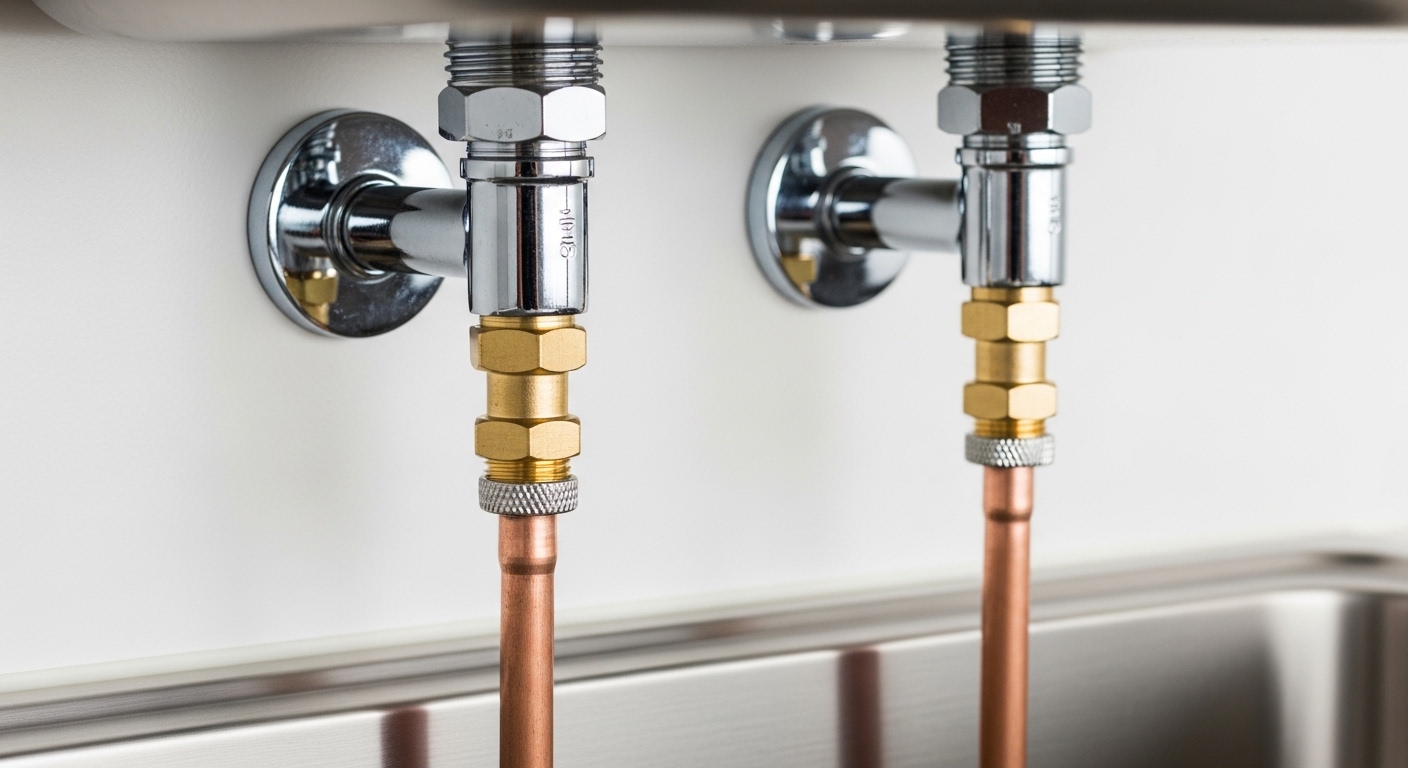
Before you buy a single fitting, get under the sink with a flashlight and a small mirror. You’re looking for three pieces of information: the diameter of the copper tubing, the type of fitting at the angle stop, and the condition of the copper itself. Photograph the entire setup before you touch anything — it makes hardware store conversations infinitely easier.
Common Copper Connection Types You’ll See
- 3/8-inch OD compression copper: The most common configuration. A brass compression nut and ferrule grip the copper at the angle stop and again at the faucet shank.
- 1/2-inch sweat copper stubs: Older homes may have copper soldered directly into a threaded adapter or stop valve. The stub itself runs straight up to the faucet.
- Chrome-plated copper risers: Decorative bent copper with a flared or compression end, often seen in 1970s and 1980s installations where the cabinet floor was open to view.
- Soft annealed copper coils: Flexible copper tubing connecting the stop to the faucet, common on icemakers and older bar sinks.
If your copper is green, pitted, or shows white crust at the compression ferrule, plan to cut back at least two inches and start with fresh copper. Stressed or oxidized copper will not reseal cleanly even with a brand-new ferrule, and a slow weep will appear within weeks.
Tools and Materials You Need for the Job
Essential Tools
- Extended-reach adjustable basin wrench (11-inch minimum, telescoping preferred)
- Two 10-inch adjustable wrenches
- Tubing cutter sized for 3/8-inch and 1/2-inch copper
- Deburring tool or fine 220-grit emery cloth
- Bucket and a stack of shop towels
- LED headlamp or under-cabinet work light
- PTFE thread-seal tape (standard white is correct for potable water)
- Channel-lock pliers wrapped in electrical tape to protect plated finishes
Replacement Parts and Fittings
- New kitchen faucet with included installation hardware
- Two 3/8-inch compression-to-3/8-inch female compression brass adapters if you plan to reuse copper stubs
- Two braided stainless steel supply lines (3/8-inch compression × 1/2-inch or 3/8-inch faucet connector) sized 20 inches or longer
- New brass ferrules and compression nuts — never reuse the old ones
- Plumber’s putty or 100% silicone — only if your faucet’s base gasket requires it (most modern faucets do not)
- Optional: new 1/4-turn ball-valve angle stops if your existing ones are stiff
Comparison: Copper, Braided Stainless, and PEX Connection Methods
| Connection Method | Best For | Lifespan | Difficulty (1-5) | Approx. Cost |
|---|---|---|---|---|
| Reuse copper stub with new compression ferrule | Clean, straight copper in good condition | 20+ years | 3 | $3–$6 |
| Copper-to-braided stainless adapter | Most retrofit jobs (recommended) | 10–15 years (replace hose) | 2 | $12–$20 |
| Sweat a new copper stub | Damaged or too-short copper | 30+ years | 5 | $15 + torch kit |
| SharkBite push-to-connect on copper | Emergency or no-torch installs | 25 years per manufacturer | 1 | $10–$14 |
| Transition to PEX with copper crimp ring | Major repipe, not a single-faucet swap | 40+ years | 4 | $25+ tooling |
For the average DIY homeowner, the second row — copper compression to braided stainless — is the right answer about 90% of the time. It preserves your existing copper, gives you the flexibility modern faucets need under the deck, and is fully reversible if you ever change fixtures again.
Step-by-Step: Replace Kitchen Faucet That Has Copper Supply Lines
Step 1: Shut Off the Water and Drain Pressure
Turn both angle stops clockwise until snug. Open the existing faucet’s hot and cold handles to drain residual line pressure. If your angle stops are old multi-turn valves that won’t fully close, shut off water at the main and plan to replace the stops while you’re already under there — it’s a 15-minute add-on with a quarter-turn ball valve and worth every penny.
Step 2: Disconnect the Old Faucet
Place a bucket under the connections. Using two wrenches — one to hold the angle stop body stationary, one to break the compression nut — loosen each nut counter-clockwise. Expect a small amount of trapped water. Once both supply lines are free, reach up with your basin wrench and loosen the mounting nuts on the underside of the deck. Lift the old faucet out from the top, then clean the sink deck thoroughly with isopropyl alcohol.
Step 3: Inspect and Prep the Copper Stubs
This is the most important step when you replace kitchen faucet that has copper supply lines, and the one most rushed jobs get wrong. With the old nut removed, examine the copper carefully:
- If the old ferrule comes off cleanly, you can install a new ferrule and nut and reuse the stub.
- If the ferrule is fused on or scored, cut 1/2 inch below it with a tubing cutter and slide on a fresh nut and ferrule.
- Deburr the cut with a deburring tool or 220-grit emery cloth. A burred edge will not seal.
- Wipe the copper clean — no debris, no grit, and absolutely no thread tape on the compression surface.
Step 4: Mount the New Faucet
Drop the faucet’s pre-attached supply lines (most new faucets ship with permanent braided hoses) through the deck plate gasket and into the mounting hole. From below, thread on the mounting nut or horseshoe bracket per the manufacturer’s instructions. Hand-tighten, verify the faucet is centered and square to the backsplash, then snug with the basin wrench. Avoid over-tightening — modern faucet bodies are thinner-walled than older brass castings, and you can crack the base by reefing on it.
Step 5: Connect to the Copper Supply Lines
If your new faucet has 3/8-inch female compression inlets at the end of its braided hoses, thread them directly onto the copper stub using a new ferrule and nut. If it has 1/2-inch IPS male threads, install a 1/2-inch FIP × 3/8-inch compression brass adapter onto the faucet hose, then connect the adapter to the copper.
Tightening sequence matters: hand-tight, then exactly one full turn with a wrench. That’s the sweet spot for a compression seal on copper. Over-tightening crushes the ferrule into the copper and creates a slow weep that won’t show up until day three, long after you’ve put your tools away.
Step 6: Open the Stops and Pressure Test
Open the angle stops slowly — one-quarter turn, wait, listen, then full open. With the faucet handle in the off position, watch every connection for 60 seconds. Then open the faucet on both hot and cold, remove the aerator to flush construction debris through the lines, and run water for two minutes. Dry every fitting with a paper towel and recheck after 10 minutes, again at 30 minutes, and once more the next morning. A pinhole leak will telegraph as a damp spot before it ever drips.
Common Mistakes to Avoid
- Reusing an old ferrule. Ferrules deform once. Always install a new brass ferrule with a new nut, even if the old one looks fine.
- Applying thread tape to compression threads. Compression seals at the ferrule, not the threads. Tape can actually prevent the ferrule from seating properly.
- Kinking the copper. Rigid copper bent more than five degrees from its original line will stress-crack within months. If the new faucet sits in a different position, transition to a braided supply line.
- Skipping the deburr. A microscopic burr will cut the new ferrule and create a permanent leak path that no amount of tightening will fix.
- Over-tightening. One full turn past hand-tight. Then stop. If it still drips, the problem is the copper or the ferrule, not the torque.
- Ignoring the angle stops. If they’re more than 15 years old, replace them. Stops fail more often than faucets do.
Protecting Your New Faucet Investment
A new faucet is a several-hundred-dollar fixture, and the finish — whether it’s brushed nickel, matte black PVD, polished chrome, or champagne bronze — is the part that gets touched ten times a day. The most common installation-day mistake is a chipped or scratched finish from a basin wrench slipping at the worst possible moment. We cover prevention strategies in detail in our guide to how to protect faucet finishes from scratches, which is worth reviewing before you torque your first nut.
If your local water is hard or heavily chlorinated, adding inline filtration during this same project is a smart efficiency move. Many homeowners replacing a kitchen faucet also size-up to a wider spout for filtered drinking water — see our wide faucet water filter buyer’s guide for spout compatibility specs. And if you’re still shopping for the new faucet itself and considering lighter finishes, our breakdown of white kitchen mixer taps that B&Q shoppers compare in 2026 covers cartridge and color trends that pair particularly well with copper-line homes.
When to Call a Licensed Plumber Instead
Most copper-line faucet swaps are within DIY range, but call a pro if you encounter any of the following:
- Angle stops that won’t close or are seized to the wall stub
- Sweat fittings that need to be cut and re-soldered with a torch
- Galvanized-to-copper transitions showing dielectric corrosion
- Lead solder joints in pre-1986 homes — a plumber can verify and water-test for lead
- Any sign of pinhole leaks elsewhere on the supply line, which usually signal whole-system corrosion
- Slab-on-grade homes where supply lines run through concrete
A licensed plumber will typically charge $150 to $350 for a straightforward kitchen faucet replacement on copper, including new angle stops and braided supply lines. That price climbs quickly if any soldering or wall repair becomes necessary.
Standards, Testing, and Warranty Notes
Every Avovida kitchen faucet ships compliant with ASME A112.18.1 / CSA B125.1 for plumbing supply fixtures, NSF/ANSI 61 and NSF/ANSI 372 for low-lead drinking water contact, and EPA WaterSense flow-rate certifications where applicable. Our compression fittings are tested to 400 psi static pressure — roughly five times typical residential supply pressure — and our braided stainless connectors carry a 10-year leak-proof warranty against manufacturing defects. Keep your purchase receipt; warranty claims require proof of purchase and a photograph of the failed component. Faucet bodies are covered by a limited lifetime warranty to the original homeowner.
FAQ
Can I connect a new kitchen faucet directly to existing copper supply lines?
Yes, in most cases. If the copper is 3/8-inch OD and in good condition, you can either reuse the stub with a new ferrule and nut, or attach a braided stainless connector via a compression-to-threaded adapter. Avoid reusing old ferrules — they deform once and won’t reseal reliably.
Do I need to solder anything to replace a kitchen faucet on copper lines?
Almost never. Modern compression fittings and braided supply lines mean you only need wrenches, not a torch. Soldering only comes into play if the existing copper stub is too short, kinked, or damaged and you need to add length back. If that’s the case, a SharkBite push-to-connect coupling is a no-torch alternative.
What size are most kitchen faucet copper supply lines?
3/8-inch outside diameter (OD) is the residential standard for kitchen and bathroom faucets in the United States. The angle stops are typically 1/2-inch FIP inlet by 3/8-inch compression outlet. Always measure with a caliper before buying fittings — eyeballing copper diameter is the number-one reason DIYers end up making two trips to the hardware store.
Should I replace the angle stops while I’m replacing the faucet?
If your stops are older multi-turn valves, more than 15 years old, or stiff to operate, yes. Modern quarter-turn ball-valve stops cost $8 to $12 each and add only 20 minutes to the job. You’ll be glad you did the next time the faucet needs service — and a stuck stop is the difference between a routine repair and an emergency plumber call.
Can I use push-to-connect fittings like SharkBite on copper supply lines?
Yes — push-to-connect fittings are rated for use on type L and type M copper and are code-approved in most U.S. jurisdictions. They’re a good emergency or no-torch option, though traditional compression remains the most common method for under-sink work and is generally considered easier to service long-term.
How long does it take to replace a kitchen faucet that has copper supply lines?
For a confident DIYer, plan on 60 to 90 minutes. First-timers should budget two to three hours. The actual plumbing takes about 30 minutes; the rest is removal of the old faucet, cleaning the deck, organizing fittings, and pressure-testing.
Why is my new connection leaking even after tightening?
Three usual suspects: the copper has a burr or scratch where the ferrule sits, the ferrule is over-compressed and deformed, or the copper is out of round from being squeezed by a wrench. Cut back one inch, deburr carefully, install a fresh ferrule and nut, and re-tighten to exactly one full turn past hand-tight. If it still leaks, switch to a braided supply line with a threaded adapter.
About the Author and Avovida
This guide was written by the Avovida fixtures team, led by a master plumber with 18 years of residential service experience across California and Texas. All installation procedures are reviewed against current Uniform Plumbing Code (UPC) and International Plumbing Code (IPC) requirements. Avovida designs and tests kitchen and bathroom faucets at our Long Beach quality lab, and every fixture we ship is pressure-cycled 500,000 times before leaving the line. Have a tricky install? Email our support desk with a photo of your under-sink setup and we’ll walk you through the right fittings for your specific copper configuration — free, whether or not you buy from us.