
If you’re framing a new walk-in shower or gutting an old tub surround, the single number that derails more projects than any other is the stand up shower valve rough in height. Set it too low and you’ll spend the rest of your life bending over to turn the water on; set it too high and short users in the household can’t reach it comfortably while standing outside the spray. The good news is that the “right” number isn’t a mystery — it’s a small, well-defined range that every major brand designs around, and once you understand how it ties to head height, valve depth, and code, you can dial it in confidently the first time.
This guide is written for homeowners and weekend DIYers who are doing real framing or remodel work, not just picking a trim kit. We’ll cover the standard height, why brand and model change the depth, how to handle non-standard users (tall, short, kids, accessibility), and the small measurement habits that prevent expensive do-overs after the drywall and tile go up.
What is the standard stand up shower valve rough in height?
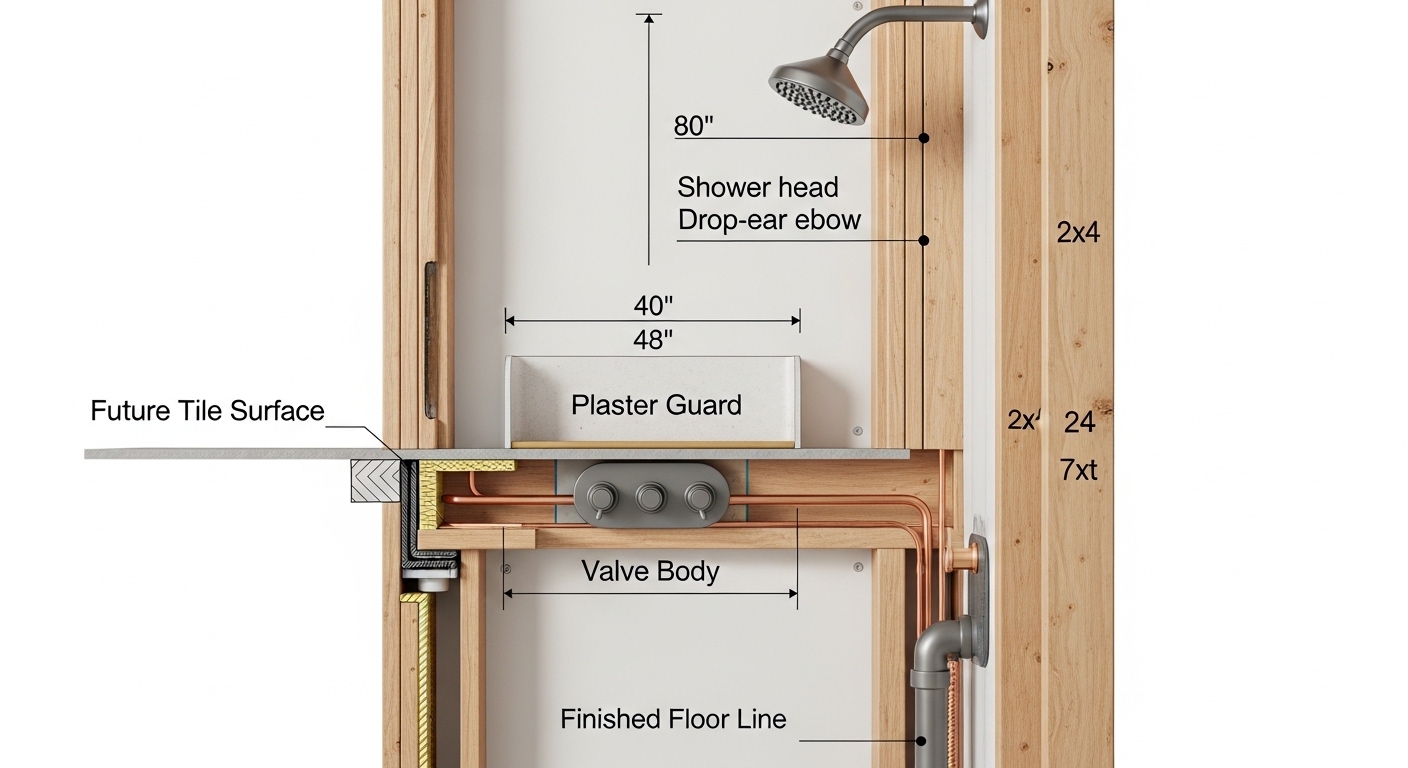
The standard rough-in height for a stand-up shower valve is 48 inches from the finished floor to the center of the valve, with an accepted working range of 38 to 48 inches. That measurement is taken to the centerline of the valve body — not the top of the handle and not the top of the cartridge stem. Most pros, including plumbers working under the International Residential Code (IRC) and the Uniform Plumbing Code (UPC), land at 48 inches because it puts the handle at a natural reach for an average-height adult standing outside the spray to turn the water on without getting blasted.
Why the range? A shower-only stall behaves differently than a tub/shower combo. In a tub/shower, the diverter valve is usually set lower (around 28 inches) so a person sitting in the tub can reach it. In a stand-up shower, no one’s sitting, so the valve climbs to a standing-reach height. Inside that 38–48 inch band:
- 38–42 inches: common when the homeowner wants the valve reachable from outside the curb without leaning in much (great for older users or anyone with mobility limits).
- 43–46 inches: the “comfortable middle” — high enough to keep the handle out of accidental knee bumps, low enough to operate from outside the spray.
- 47–48 inches: the traditional code-target height most plumbers default to, and what showroom mock-ups are built to.
How high should the shower head outlet sit above the valve?
The shower head outlet (the drop-ear elbow your shower arm threads into) is roughed in at 72 to 80 inches above the finished floor, with 80 inches being the modern default. That gives you roughly six and a half feet of clearance from the floor to the underside of a standard shower head — enough that someone 6’2″ isn’t ducking under the spray.
If anyone in the household is over 6 feet tall, bump the outlet to 82–84 inches and use a shorter shower arm. If your tallest user is closer to 5’6″, you can drop the outlet to 76 inches and still get a comfortable shower without spraying the ceiling. The shower head outlet height matters more than the valve height when it comes to comfort, because the valve only gets touched twice per shower; the spray pattern affects every second you’re in there.
One detail people miss: the outlet height is measured to the center of the drop-ear elbow, not to where the shower head will end up. A typical 6–8 inch shower arm angled downward drops the head 3–4 inches below the outlet, so an 80-inch outlet gives you a head face around 76–77 inches off the floor.
Does the user’s height actually change the rough-in height — or is it overrated?
Yes, it absolutely changes the right rough-in height for your shower, and no, it’s not overrated — it’s the single most common reason homeowners regret a remodel a year later. The 48-inch default is built for an average 5’8″–5’10” adult. If your household skews shorter, taller, or includes wheelchair users, you should redesign the valve placement on purpose, not just default to spec.
Here’s a quick scenario-based guide:
- Average adults (5’6″–6’0″): 46–48 inches works well. No need to deviate.
- Tall household (6’1″+): bump the valve to 48–50 inches and the shower head outlet to 82–84 inches.
- Shorter users / kids’ bath (under 5’4″): 40–44 inches on the valve and 74–76 inches on the head outlet keeps everything within reach.
- Aging-in-place / ADA-style accessibility: 38–48 inches per ADA §608.4 for the valve, with operable parts (handle) no more than 48 inches from the floor when reached from a seated position.
- Curbless / roll-in showers: 38–43 inches for the valve, accessible from a shower bench.
If the bathroom serves a wide range of users (a family shower, for example), 44 inches is a smart compromise — every member can reach it, no one is bending or stretching.
What’s the difference between valve height and valve depth — and why do plumbers always ask about both?
Valve height is the vertical position above the floor; valve depth is how far the valve body sits behind the finished wall surface. They are two completely separate measurements and getting depth wrong is the more expensive mistake, because depth determines whether your trim plate sits flush against the tile or floats off it with a visible gap.
Every major manufacturer prints a “min/max” wall thickness range on the plastic plaster guard that ships with the valve. For Delta MultiChoice, that range is roughly 13/16 inch to 2-5/16 inch from the front of the valve body to the finished surface. For Moen M-PACT, it’s about 1/2 inch to 1-3/4 inch. For Kohler Rite-Temp, around 1/2 inch to 1-1/2 inch. You set the valve so that the finished tile surface ends up within that printed range. Cut the plaster guard with a utility knife flush to your planned tile face, and you’ve got a built-in depth gauge.
If the wall is too thick (valve too deep), the trim sleeve won’t reach and the cartridge stem won’t engage the handle. If the wall is too thin (valve too proud), the trim plate hits the valve body before it touches the tile, leaving an ugly standoff. There is no good fix after the tile goes up — you’d be tearing out finished surfaces. That’s why pros measure twice and dry-fit the trim before closing the wall.
How do major brands compare on rough-in specs?
Most brands share the 48-inch height convention, but their depth tolerances, valve body geometry, and stub-out clearance differ enough that you should always pull the spec sheet for your exact model before framing. Here’s a side-by-side of the popular shower valve platforms:
| Brand / Valve Platform | Typical Valve Height (Stand-up Shower) | Wall Depth Range (Front of Valve to Finished Surface) | Stub-Out Configuration | Notes |
|---|---|---|---|---|
| Delta MultiChoice Universal | 45–48 in. | 13/16 in. – 2-5/16 in. | 1/2 in. CPVC, copper, or PEX | Same rough body fits any Delta trim — future-proof. |
| Moen M-PACT (Posi-Temp, Moentrol) | 45–48 in. | 1/2 in. – 1-3/4 in. | 1/2 in. IPS, copper sweat, PEX crimp | Trim/cartridge interchangeable on one valve body. |
| Kohler Rite-Temp | 45–48 in. | 1/2 in. – 1-1/2 in. | 1/2 in. NPT, sweat, PEX | Tighter depth range — measure carefully. |
| Pfister 0X8 / Universal | 45–48 in. | 3/4 in. – 1-3/4 in. | 1/2 in. CC, IPS, PEX | Pre-mounted bracket simplifies stud placement. |
| Avovida pressure-balance valves | 44–48 in. | 3/4 in. – 2 in. | 1/2 in. NPT, sweat, PEX | Designed for retrofit; deeper allowance for over-tile installs. |
For most Delta-platform projects, our breakdown of the best Delta bathroom faucet options for 2026 walks through which trim kits work with the MultiChoice rough body, which helps if you’re trying to lock in the style before the wall closes up.
How do you measure and frame the rough-in correctly the first time?
Measure from the finished floor — not the subfloor — to the center of the valve, then mount the valve to a horizontal 2×6 cross-brace nailed between the studs at that height. Use the plaster guard as both a depth gauge and a stud-bay centering jig. That’s the whole job in one sentence; below is the unpacked version.
- Establish your finished floor. Add the thickness of your shower pan, mortar bed, and tile (or solid-surface pan) to the subfloor. A typical mud bed + 1/4-inch tile adds 1-1/2 to 2 inches over the subfloor. If you measure from the subfloor and forget the pan, your valve ends up 2 inches lower than planned.
- Mark the valve centerline on a stud. 48 inches up, centered between two studs in the wet wall.
- Install a horizontal 2×6 brace. Notch the studs or face-mount the brace so the front edge sits flush with the front of the studs. The valve will mount to this brace.
- Set the valve depth. Position the front of the valve body so the plaster guard’s marks line up with where the finished tile surface will be. If your wall is 1/2-inch drywall + 1/4-inch backer + 3/8-inch tile, the finished face is 1-1/8 inch in front of the studs — set the valve depth accordingly.
- Plumb the shower head drop-ear at 80 inches. Center it directly over the valve unless you’re running an offset (some designs put the head off-axis for a side-spray feel).
- Pressure-test before close-up. Cap the outlets and run line pressure for 15 minutes minimum. Catching a sweated joint leak now is free; catching it through finished tile is brutal.
If you’re working with existing copper, the soldering technique and supply prep matter just as much as the rough-in dimensions. Our guide on working with copper supply lines covers the same joint discipline that applies to shower valve inlets — clean, flux, sweat, and don’t trap the valve cartridge in heat.
Can you adjust the rough-in height after the wall is closed up?
Technically yes, practically no — adjusting valve height after drywall and tile means tearing into the finished wall, and the cost almost always exceeds doing it right the first time. The exception is depth: if you’re within a half-inch or so of the manufacturer’s range, extension kits exist for most platforms (Delta sells a deep rough-in extension kit, Moen sells extension kits for M-PACT, and so on). But these are designed for unusually thick walls, not as a fix for sloppy framing.
If you discover the valve is dramatically wrong only after tile is up, your realistic options are:
- Use an escutcheon extension or decorative cover plate to hide a 1–2 inch depth error.
- Live with it if the height is wrong by a couple inches and you can still reach the handle.
- Cut an access panel from the back side (closet, hallway) and reposition the valve through the back of the wall — only practical when the back side isn’t tile.
- Open the front and redo it — the only real cure for major errors. Budget for new tile, new backer, new pan curb, and a plumber.
What are the most common rough-in mistakes that cause leaks or code failures?
The four mistakes plumbing inspectors see most often are: measuring from the subfloor instead of finished floor; orienting the valve upside-down; over-tightening sweat joints and warping the cartridge seat; and forgetting the anti-scald (pressure-balance or thermostatic) requirement entirely. Codes in nearly every U.S. jurisdiction require an anti-scald valve in showers — a plain ball valve is a code violation and a real injury risk.
Other recurring problems:
- No nailer behind the shower head elbow, so the arm wobbles after a few months.
- Hot and cold reversed — easy to fix at rough-in, painful after trim is on.
- Trim plate gap because the depth measurement was made without accounting for tile thickness.
- Drip leaks at the cartridge after a year — usually a damaged seat from heat-warping during soldering. Our guide on fixing leaky two-handle faucets covers cartridge replacement, which uses the same principles inside a shower valve.
- Finish damage during install from a pipe wrench gripping a polished trim sleeve. Cover any exposed finish during work — our notes on protecting faucet finishes from scratches apply equally to shower trim.
What about thermostatic vs. pressure-balance — does it change the rough-in height?
It doesn’t change the height — 38–48 inches still applies — but thermostatic valves are physically larger, so they often demand a deeper stud bay (2×6 framing rather than 2×4) and a slightly different mounting bracket. If you’re planning a multi-function shower with body sprays, a hand-held, and a rain head, you’ll likely be using a thermostatic valve with a separate volume control set below the temperature handle — usually 6 to 10 inches lower. Plan both rough-ins at the same time.
How does this fit into a full bathroom remodel timeline?
The valve rough-in happens during the plumbing rough phase, after framing and before drywall, electrical finish, or tile. Once the valve is set and pressure-tested, the inspector signs off, drywall and cement board go up, the pan is poured and waterproofed, tile goes on, and the trim kit installs last. If you’re sequencing your own project, lock in the trim kit (and therefore the brand-specific rough valve) before framing, because the valve body geometry varies enough that you can’t safely commit to studs until you know the depth allowance.
FAQ
What is the code-required height for a shower valve?
U.S. plumbing codes don’t specify an exact height for the valve in a standard residential shower — they require an anti-scald valve and call out a maximum hot water output temperature (typically 120°F). The 38–48 inch range is an industry convention, not a code mandate. ADA Section 608.4 does require operable parts to be no more than 48 inches above the floor for accessible showers.
Should the shower valve be centered between the studs?
Yes, ideally. Most rough-in valves include a mounting bracket designed to attach to a horizontal cross-brace between two studs spaced 16 inches on-center. Centering the valve gives the trim plate equal stud support and prevents racking of the wall around the valve over time.
Can I put the shower valve on a different wall than the shower head?
Yes. In larger walk-in showers, designers often put the valve on the wall closest to the entry so users can start the water and step back before the spray hits. The shower head sits on the opposite or adjacent wall. The valve still roughs in at 38–48 inches; only the head outlet position changes.
What’s the right rough-in height for a kids’ bathroom?
Drop the valve to 40–44 inches and the shower head outlet to 74–76 inches. Kids grow, so don’t go lower than 40 inches — within a few years the lower setting will feel awkward for the same child as a teenager.
Do I need a plumber, or can I DIY the rough-in?
In many jurisdictions, an owner can pull a homeowner permit and do their own residential plumbing — but the work must still pass inspection. The rough-in is the most consequential part of the install (everything downstream is cosmetic), so if you haven’t soldered copper or worked with PEX before, a plumber for the rough-in phase is money well spent. You can still install the trim kit yourself afterward.
How do I know if my valve is installed too deep after the wall is closed?
The trim handle won’t fully engage the cartridge stem, or the trim plate sits flush against the tile but the handle won’t turn 90 degrees of travel. Manufacturer extension kits add 1/2 to 1-1/4 inch of reach, which covers most depth errors short of major framing miscalculations.
Does pipe material (PEX vs. copper) affect the rough-in height?
No — the height is identical whether you’re running copper, PEX, or CPVC. PEX is easier to route through tight stud bays and doesn’t transfer heat to the cartridge during install, which is why a lot of remodelers prefer it for shower valve supplies. Copper is still the standard for visible runs and where local code requires it.
Final word — and who wrote this
If you remember nothing else: 48 inches to the valve centerline, 80 inches to the shower head outlet, measured from the finished floor, with the valve depth set against the manufacturer’s plaster guard. That gets 95% of stand-up showers right the first time, and the remaining 5% are scenario adjustments for height, accessibility, or family-shared bathrooms.
About the author: This guide was written by the Avovida product and installation team, which spends its days helping homeowners, contractors, and remodelers pick the right shower valve, head, and trim combination for real bathrooms. We test every shower valve we sell to ASME A112.18.1 / CSA B125.1 standards and back the valve bodies with a lifetime limited warranty against manufacturing defects. If you have a tricky framing layout or a non-standard wall thickness, reach out through avovida.net before you frame — getting the depth right at the planning stage is free; fixing it after tile is not.