
If you’re staring at a dripping faucet or a pile of loose fittings, knowing your chrome faucet parts is the difference between a 20-minute fix and a $180 plumber visit. Chrome is the most common faucet finish in American homes for a reason — it’s affordable, easy to clean, and it plays nice with almost any bathroom or kitchen. But “chrome” only describes the outside coating. What actually makes the faucet work (and what fails) is the plumbing hardware underneath. This guide breaks down every part by name, tells you which ones actually break, and shows you how to buy the right replacement the first time.
At avovida, we sell and test faucets and their components every day, so we’ll skip the fluff and give you the real terminology, the real failure points, and the real numbers you need to shop smart.
What are the main chrome faucet parts, and what does each one actually do?
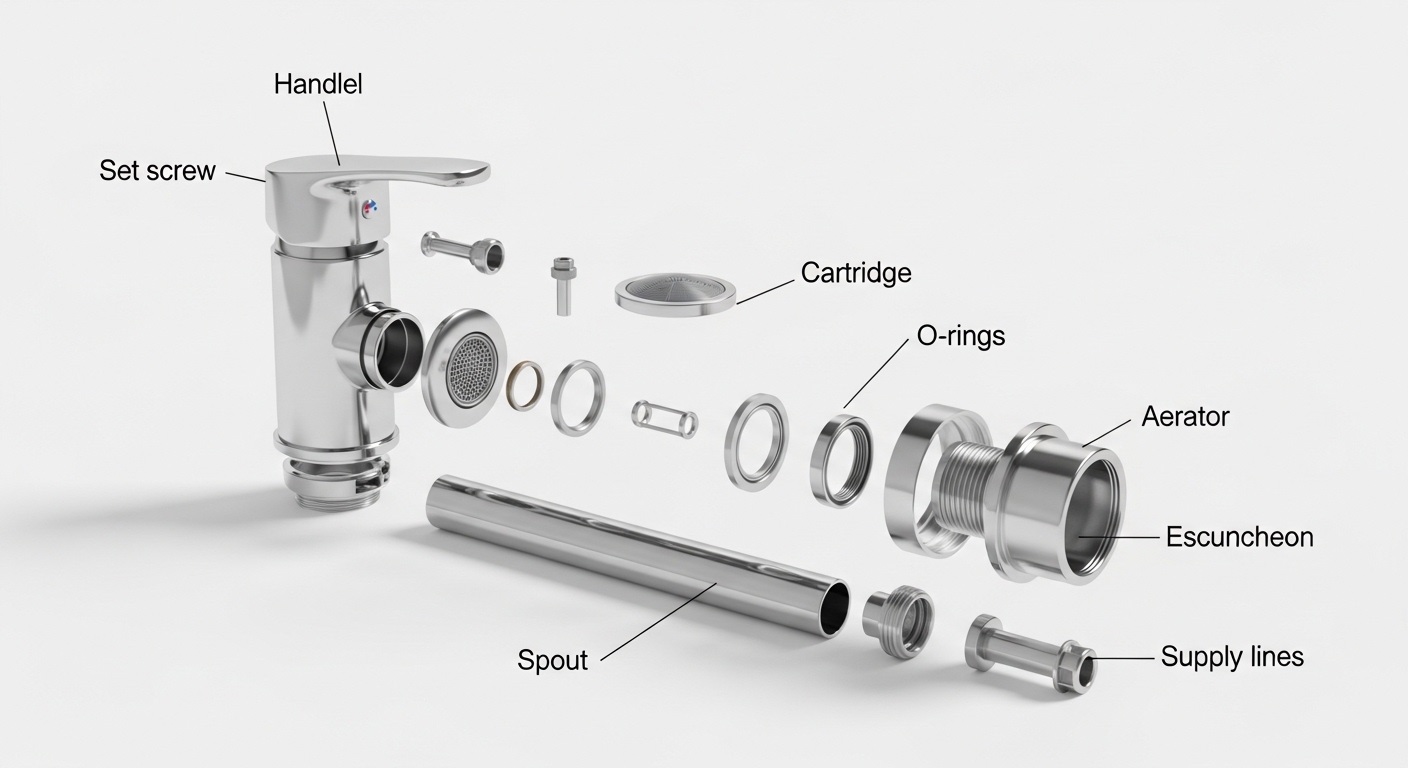
A chrome faucet is really a stack of about a dozen parts, and only three or four of them ever cause trouble. Here’s the plain-English rundown of every core component, from the handle you touch down to the supply lines you never see.
- Handle — the lever or knob you turn. On chrome faucets it’s usually zinc or brass with a chrome plate, held on by a small hidden set screw (often under a decorative button cap).
- Cartridge — the heart of most modern faucets. This cylindrical valve controls how much water flows and how hot or cold it is. When your faucet drips or gets hard to turn, the cartridge is the #1 suspect.
- Valve seat / stem (on older two-handle faucets) — the compression parts that a rubber washer presses against to shut off water. Common in homes built before the 1990s.
- O-rings — small rubber rings that seal joints, especially where the spout swivels. A worn O-ring is why water leaks from the base of the spout, not the tip.
- Washers and seals — flat or beveled rubber pieces that create a watertight shut-off in compression faucets.
- Aerator — the screw-in screen at the tip of the spout. It mixes air into the water to reduce splashing and save water. It clogs with mineral scale and is the cheapest part to replace.
- Spout — the arched or straight tube the water comes out of. On pull-down kitchen faucets, this includes the sprayer head and hose.
- Escutcheon (deck plate) — the chrome base plate that covers extra sink holes and hides the mounting hardware.
- Mounting nut and gasket — clamp the faucet to the sink or countertop from below.
- Supply lines — the flexible braided hoses that connect the faucet to your shut-off valves.
The takeaway: when people say they need “chrome faucet parts,” they almost always mean a cartridge, O-rings, an aerator, or a handle — the wear items. The chrome-plated trim (spout, escutcheon, handle) rarely fails mechanically; it just gets scratched or the plating flakes over many years.
Which chrome faucet parts fail first, and how do I know which one is the problem?
The part that fails first is almost always the cartridge or the O-rings — rubber and internal seals wear out long before the chrome finish does. You can diagnose the exact culprit by where the water is coming from and when the problem shows up.
Use this quick symptom-to-part map:
| Symptom | Most Likely Part | Typical Fix Cost |
|---|---|---|
| Drip from the spout tip when off | Cartridge (or washer/seat on old faucets) | $8–$45 |
| Water leaks from base of spout when on | Spout O-rings | $3–$12 |
| Weak, sputtering, or split stream | Clogged aerator | $4–$15 |
| Handle is stiff or won’t shut off fully | Cartridge (mineral buildup) | $8–$45 |
| Handle wobbles or spins loose | Set screw / handle adapter | $2–$10 |
| Leak under the sink | Supply line or mounting gasket | $6–$20 |
| Chrome flaking or pitted | Replace trim piece or whole faucet | $25–$200+ |
A good rule: if the drip is at the tip, look inside (cartridge/washer). If the leak is at the base or swivel, it’s an O-ring. If the stream looks wrong but there’s no leak, start with the aerator — it’s a two-minute unscrew-and-rinse job before you spend a dime. If you want a full walk-through of chasing down a drip on a two-handle unit, our guide on how to fix a leaky two-handle faucet without calling a plumber covers the compression-style seats and washers step by step, and for internal valve issues our guide to fixing a leaking tap valve yourself gets you from diagnosis to done in under an hour.
Are chrome faucet parts universal, or do I need to match the brand?
Chrome faucet parts are not universal — the cartridge and internal valves must match your faucet’s brand and often the exact model, while trim like aerators and supply lines are more standardized. This is the single most expensive mistake DIYers make, so get it right before you buy.
Here’s how it breaks down by part:
- Cartridges — brand and model specific. A Moen 1224 cartridge won’t fit a Delta or a Kohler. Even within one brand, single-handle and two-handle versions differ. Find your model number (usually stamped under the spout, on the escutcheon, or in your original paperwork) before ordering.
- O-rings and washers — size specific, brand flexible. These come in assortment kits by diameter. Match the size and material (buy Buna-N or silicone, not cheap generic rubber).
- Aerators — mostly standard threads. Most US faucets use a 15/16″ male or 55/64″ female thread. A “dual-thread” aerator fits both. Measure or bring the old one to the store.
- Supply lines — universal-ish. Standard 3/8″ compression on the valve side and 1/2″ on the faucet side covers most homes, but check your connections.
- Handles and trim — brand specific. The broach (the splined pattern where the handle grips the stem) varies by manufacturer.
The safest path: identify your faucet brand and model number, then buy that manufacturer’s genuine repair kit. Brands like Moen, Delta, Kohler, and Pfister sell kits that bundle the cartridge, O-rings, and seals together — and many back them with a lifetime warranty on the working parts. If you can’t find a model number, snap a photo of the faucet and the old part and take it to a plumbing supply counter.
How do I find my faucet’s model number?
Check four places, in order: (1) under the spout or on the underside of the escutcheon for a stamped code, (2) the original installation manual or receipt, (3) a sticker on the supply lines or cardboard tag left from install, and (4) the manufacturer’s website “identify my faucet” tool, where you match your handle and spout shape to a product photo. Once you have the model, ordering the correct chrome faucet parts becomes foolproof.
Is chrome-plated plastic okay, or should I insist on chrome over brass?
For any part that holds water pressure or threads together repeatedly, insist on chrome over solid brass — chrome-plated plastic is fine only for purely decorative pieces like a button cap or trim ring. This is the quality line that separates a faucet that lasts 15 years from one that cracks in three.
Why brass matters: brass resists corrosion, handles hot water without warping, and holds threads tightly so parts don’t strip. Plastic under a chrome coating can look identical on the store shelf but becomes brittle with heat cycling and mineral exposure. When you’re buying replacement chrome faucet parts, a few dollars more for a brass body or brass valve is almost always worth it.
| Feature | Chrome over Brass | Chrome over Zinc | Chrome over Plastic |
|---|---|---|---|
| Durability | Excellent (15–20+ yrs) | Good (8–12 yrs) | Fair (3–7 yrs) |
| Corrosion resistance | High | Medium | Low |
| Handles hot water | Yes, no warping | Yes | Can warp/crack |
| Thread strength | Strong | Moderate | Strips easily |
| Best for | Bodies, valves, spouts | Handles, trim | Caps, decorative rings only |
| Relative cost | $$$ | $$ | $ |
Chrome itself is just the finish — a thin, hard, bright layer applied over the base metal. What you’re really paying for is the metal underneath. If you’re weighing finishes and base metals more broadly, our comparison of a zinc bathroom faucet versus spending more on brass lays out exactly when the upgrade pays off and when zinc is good enough.
How much should chrome faucet parts cost, and where should I buy them?
Individual chrome faucet parts range from about $3 for an aerator or O-ring kit to $45 for a genuine brand cartridge, while a full replacement faucet with all chrome parts included runs $40 to $250 for most residential models. Buying just the failed part is nearly always cheaper than replacing the whole faucet — unless the chrome plating itself is flaking, in which case a new faucet is the better value.
Where to buy, ranked by scenario:
- Manufacturer’s genuine repair kit — best for cartridges and internal valves. Guarantees fit and usually carries a warranty. Order direct or through an authorized retailer.
- Plumbing supply house — best when you don’t know your model. The counter staff can identify parts from a photo or the old piece.
- Big-box home stores — great for universal items: aerators, supply lines, O-ring assortment kits, plumber’s grease.
- Online marketplaces — cheapest for generic parts, but watch for counterfeit “compatible” cartridges that don’t seal properly. Read reviews and confirm the model number.
One money-saving tip: buy a small tub of silicone plumber’s grease ($5) whenever you replace a cartridge or O-ring. Lubricating the new seals on install roughly doubles their lifespan and keeps the handle turning smoothly. Skipping this step is the top reason a “new” cartridge starts leaking again within a year.
Can I replace chrome faucet parts myself, and what tools do I need?
Yes — most chrome faucet part replacements are genuinely DIY-friendly and need only basic hand tools, no soldering or special skills. Swapping an aerator, O-ring, or cartridge takes 15 to 45 minutes for a first-timer. Here’s the core toolkit and the general process.
Tools you’ll need:
- Adjustable wrench and/or channel-lock pliers
- Allen/hex key set (for handle set screws)
- Phillips and flathead screwdrivers
- Needle-nose pliers (for O-rings and clips)
- Plumber’s grease and white vinegar (for descaling)
- A rag and a bowl for small parts
The universal process: Shut off the water at the under-sink valves and open the faucet to release pressure. Plug the drain so you don’t lose small parts. Remove the handle (usually one set screw), then the retaining nut or clip, then pull the cartridge straight up with pliers. Compare the old part to the new one before installing, grease the seals, reassemble in reverse, and turn the water back on slowly while checking for leaks. If a cartridge is stuck with mineral buildup, a cartridge puller tool ($10) saves a lot of frustration.
If your bigger issue is the whole faucet — say the chrome is pitted or you’re upgrading — it’s often just as easy to swap the entire unit. Our step-by-step on how to remove an old kitchen faucet walks through the trickiest part (the corroded mounting nuts under the sink) so you can get the old one out cleanly.
When is it smarter to replace the whole faucet instead of the parts?
Replace the whole faucet when the chrome plating is flaking or pitting (that’s cosmetic and can’t be repaired), when the faucet body itself is cracked or corroded, when you’ve already replaced the cartridge twice, or when parts for a discontinued model are impossible to find. If the faucet is more than 15 years old and needs a $40 cartridge, put that money toward a new faucet with a fresh warranty instead.
Author’s note & why you can trust this guide
This guide was written by the avovida product team, who source, install, and bench-test faucets and replacement components across kitchen and bathroom lines every week. We evaluate cartridges for drip-free shut-off, cycle-test handles for smooth operation, and inspect chrome plating for adhesion and corrosion resistance against standard finish durability benchmarks (the kind of salt-spray and abrasion testing reputable manufacturers use before certifying a finish). Quality faucet components in the US are typically built to meet ASME/ANSI plumbing standards and NSF/ANSI 61 for drinking-water safety, and the best working parts carry a manufacturer’s limited lifetime warranty — always keep your model number and receipt so a warranty claim is painless. When we recommend brass over plastic, it’s because we’ve watched the plastic parts fail first on our own test bench.
FAQ
What is the most common chrome faucet part that needs replacing?
The cartridge is the most commonly replaced working part — it controls flow and temperature and wears out with mineral buildup and use, causing drips and stiff handles. After the cartridge, O-rings (for base leaks) and aerators (for weak streams) are the next most frequent replacements, and both cost just a few dollars.
Are all chrome faucet cartridges interchangeable?
No. Cartridges are brand- and often model-specific — a Moen cartridge won’t fit a Delta or Kohler faucet, and single-handle versions differ from two-handle ones. Always match your faucet’s model number, which is usually stamped under the spout or listed in your original paperwork, before buying a replacement cartridge.
How do I clean chrome faucet parts without scratching them?
Wipe chrome with a soft microfiber cloth and warm soapy water, then buff dry to prevent water spots. For mineral scale, soak the part (like an aerator) in white vinegar for 30 minutes, then rinse — never use abrasive pads, steel wool, or harsh acidic cleaners, which permanently dull and scratch the chrome plating.
Is chrome or brushed nickel better for faucet parts?
Both perform well; the difference is mostly looks and fingerprints. Chrome is brighter, cheaper, and the easiest finish to find replacement parts for, but it shows water spots and fingerprints more. Brushed nickel hides smudges better but costs a bit more and has a warmer tone. For availability and value on replacement parts, chrome wins.
Why is my chrome faucet peeling or flaking?
Flaking chrome usually means the plating was applied over a plastic or low-grade zinc base, or the faucet has reached the end of its lifespan after years of heat cycling and harsh cleaners. Peeling plating cannot be repaired — it’s a signal to replace the trim piece or the whole faucet, ideally with a chrome-over-brass model that resists corrosion far longer.
Do I need to turn off the water to replace a faucet aerator?
No — the aerator is at the very tip of the spout, so you can unscrew it by hand or with pliers wrapped in a cloth without shutting off any water. Just make sure the faucet is turned off first. For any internal part like a cartridge or O-ring, however, you must shut off the under-sink supply valves.